方案 2:使用 Programmer 应用程序您也可以使用下方附带的预编译二进制文件,通过 Programmer 应用程序将固件直接刷写至设备:
2024年11月26日,更新至nRF Connect SDK v2.8.0版本。
- hello_dect_nrf9151_eu_261124.hex
- hello_dect_nrf9151_us_261124.hex
- hello_dect_nrf9161_eu_261124.hex
- hello_dect_nrf9161_us_261124.hex
- 下载您所在地区(-eu 或 -us 后缀)的 hello_dect 示例固件二进制文件。
- 在编程器应用程序中,选择“Add file”,然后点击“Browse…”
- 导航至 hello_dect 固件文件并选中,点击“Open”。
- 选择“Erase & write”,等待操作完成。
当右侧窗口中的图案停止时,操作即告完成。
以下日志输出也显示写入操作成功:
13:16:25.241 Recovering Application core13:16:25.242 Recovering Application core 0%13:16:26.440 Recovering Application core 100%13:16:26.440 Recovering Application core completed13:16:26.441 Writing HEX to Application core13:16:26.865 Writing HEX to Application core 33%13:16:26.866 Writing HEX to Application core 33%13:16:27.431 Writing HEX to Application core 100%13:16:27.432 Writing HEX to Application core completed13:16:27.432 Loading core information for Application core13:16:27.433 Update files regions according to Application core13:16:27.433 Parse memory regions for file13:16:27.434 Loading core information for Application core 0%13:16:27.463 Loading core information for Application core 100%13:16:27.463 Loading core information for Application core completed13:16:27.464 Update files regions according to Application core13:16:27.464 Parse memory regions for file13:16:31.436 Reading readback protection status for Application core13:16:31.436 Reading readback protection status for Application core 0%13:16:31.452 Reading readback protection status for Application core 100%13:16:31.452 Application core protection status 'NRFDL_PROTECTION_STATUS_NONE'13:16:31.452 Reading readback protection status for Application core completed
测试为每个开发板打开终端以查看运行状态。
在 Visual Studio Code 中,转到 nRF Connect for VS Code 窗口。
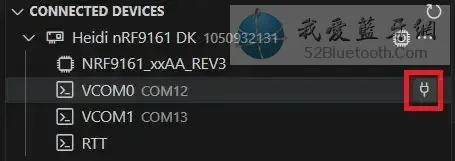
在 CONNECTED DEVICES 下,展开 nRF91x1 开发套件。
请注意存在两个 COM 端口,因为 nRF91x1 SiP 应用核心通过 TF-M 分割为安全域和非安全域。我们需要查看应用程序运行的非安全域中的终端输出。
点击COM端口右侧的图标,然后在窗口顶部选择设备。
屏幕底部应出现一个终端窗口,类似于下图所示。
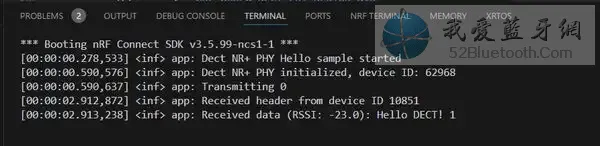
若两台设备同时运行,日志输出应类似于下图所示,显示数据包的发送与接收情况。
提示:若需调试信息,请将main.c文件第13行修改为LOG_MODULE_REGISTER(app, LOG_LEVEL_DBG);
让应用程序运行一段时间,注意在第29次传输后它会自动关闭
注意:在 prj.conf 文件中添加 CONFIG_TX_TRANSMISSION=0 将使应用程序配置为永久传输。
NR+ PHY API让我们来分析hello_dect示例程序用于与NR+ PHY固件交互的NR+ PHY API。
当使用NR+ PHY API构建自有应用程序时,需注意以下结构体struct phy_ctrl_field_common必须由应用程序自行定义。应用程序使用PHY API的发送和接收函数(nrf_modem_dect_phy_tx()和nrf_modem_dect_phy_rx()),必须构造PHY头部及可能的有效载荷。调制解调器会检查头部结构,格式错误的头部将被拒绝。
/* Header type 1, due to endianness the order is different than in the specification. */struct phy_ctrl_field_common { uint32_t packet_length : 4; uint32_t packet_length_type : 1; uint32_t header_format : 3; uint32_t short_network_id : 8; uint32_t transmitter_id_hi : 8; uint32_t transmitter_id_lo : 8; uint32_t df_mcs : 3; uint32_t reserved : 1; uint32_t transmit_power : 4; uint32_t pad : 24;};
这是PHY header的结构,其定义详见NR+规范。有关各字段的详细信息,请参阅下表。
ETSI TS 103 636-4 表 6.2.1-1 物理层控制字段
传输首先,我们来填充PHY header,其类型为struct phy_ctrl_field_common。
struct phy_ctrl_field_common header = { .header_format = 0x0, .packet_length_type = 0x0, .packet_length = 0x01, .short_network_id = (CONFIG_NETWORK_ID & 0xff), .transmitter_id_hi = (device_id >> 8), .transmitter_id_lo = (device_id & 0xff), .transmit_power = CONFIG_TX_POWER, .reserved = 0, .df_mcs = CONFIG_MCS,};
接着将定义TX操作参数,这些参数存储在struct nrf_modem_dect_phy_tx_params结构体中,其中会传递我们之前定义的header。
struct nrf_modem_dect_phy_tx_params tx_op_params = { .start_time = 0, .handle = handle, .network_id = CONFIG_NETWORK_ID, .phy_type = 0, .lbt_rssi_threshold_max = 0, .carrier = CONFIG_CARRIER, .lbt_period = NRF_MODEM_DECT_LBT_PERIOD_MAX, .phy_header = (union nrf_modem_dect_phy_hdr *)&header, .data = data, .data_size = data_len,};
最后,为发送数据包,需将存储于 tx_op_params 中的传输参数传递给函数 nrf_modem_dect_phy_tx(),该函数的签名如下:
需要特别注意的是,在DECT频段进行传输时,必须由MAC层负责控制该过程。MAC层负责管理射频资源,并根据接收信号强度指示(RSSI)测量结果确定工作信道和子时隙。仅允许使用测量结果显示为空闲的频-时窗口进行传输。
仅凭物理层API无法实现传输功能。
结语对于希望探索DECT NR+技术的开发者,Nordic Semiconductor的nRF Connect SDK v2.7.0中提供的NR+物理层API及DECT Hello示例程序是极具价值的资源。依托Wirepas、Lynq等解决方案合作伙伴的支持,以及我们持续优化的产品组合,我们致力于协助客户应对现代无线通信标准的复杂挑战。


 8546-programmer-operation-nordic-semi-wireless-iot-DXrW-600w.jpeg.webp